Camera Lenses Explained: Understand All The Functions of Your Camera Lens!
Ever looked at your camera lenses and wonder what everything does? Then this is the blog post for you!
I’ll explain everything you can see on your lens, so what each switch does, and what that funny little window thing is meant for too 😀
Learning about the tools of your trade is important, so take five minutes to cast your eye over this, and have your camera lenses explained…..

(PIN this to save and share!)
Take a look at the image below, where I’ve marked each element with a number - all you need to do is find the corresponding number on the writing below and you can find out what it is, and why it’s important.
Many of these have links to further reading too, so if you are unsure about something, click over to read the additional information which I am sure will help it all make sense .
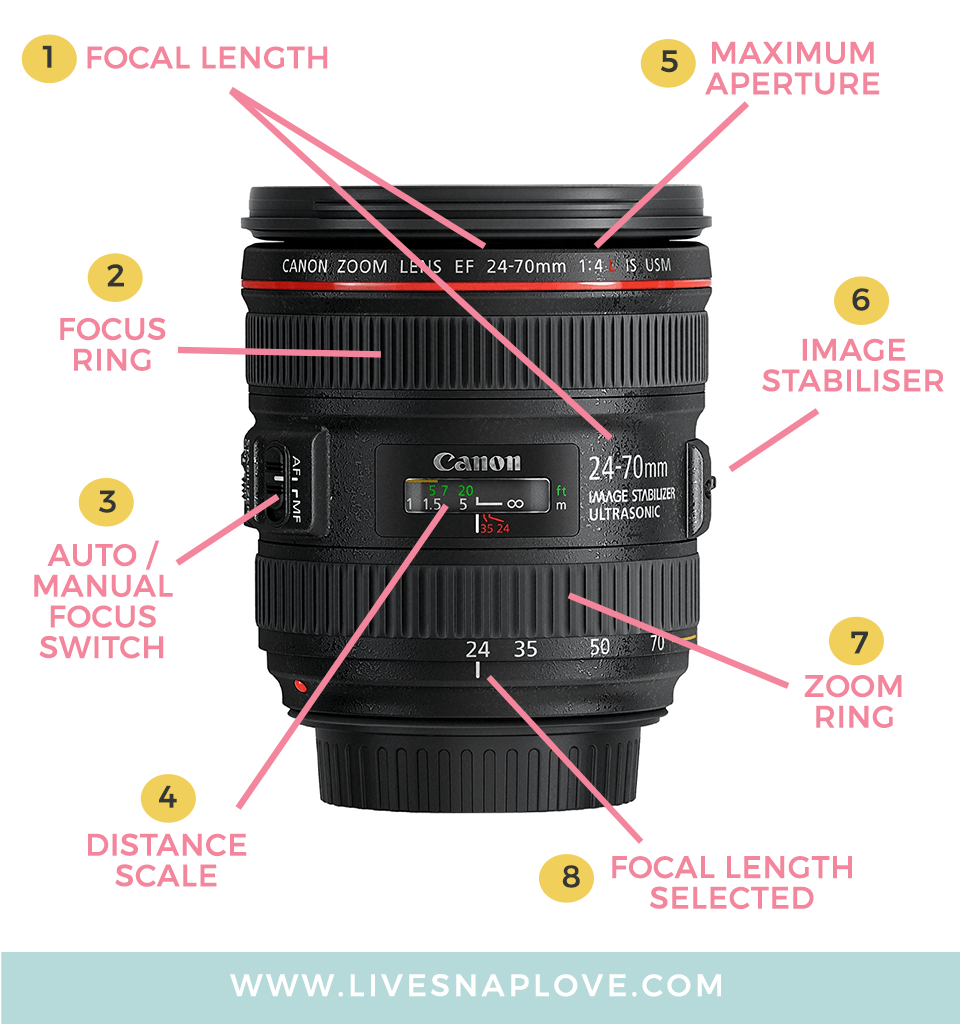
#1 Focal Length
This number is the focal length of the lens.
If you have two numbers separated with a dash (like this one here) then it is a zoom lens, which means you have a range of different focal lengths within one lens.
If you only see one number, than means you have a prime lens. Prime lenses have a fixed focal length, so you cannot zoom in or out - you have to move your feet if you want to get closer or farther away!
Essentially, the focal length of your lens dictates how much you can see within the frame - in other words whether it looks more zoomed in and everything in the frame is magnified and brought closer, or more zoomed out, when you can fit more in the frame than you can see with the naked eye.
If you want to understand more about the types of focal lengths available, and when you might want to use each one, then check out this post on the different types of camera lenses.
#2 Focus Ring
If you have your lenses switched to manual focus (more on that below!) you will turn this ring to manually focus your lens.
You will hardly ever use this, but the feature is there if you need it :)
#3 Auto / Manual Focus Switch
This switch allows you to either select Auto Focus or Manual Focus.
95% of the time you are going to have this set at Auto Focus (AF for short) This means your lens will do the work of achieving focus on the area you select.
However, there are a few occasions when it might be useful to switch to Manual Focus - for example, when taking a self portrait it can be useful to pre-focus, then switch the lens to manual focus to stop it trying to keep focusing, or if you are shooting in low light, and the lens has trouble finding focus on it’s own, you can switch over to manual focus.
If you do switch to Manual Focus, that’s when you will use the focus ring above!
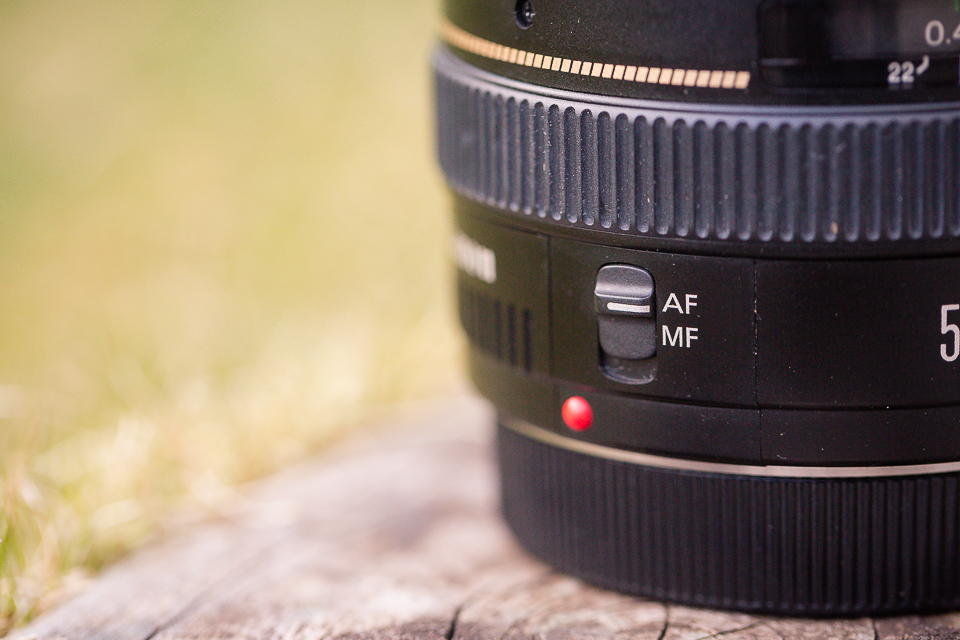
(NB If you ever find yourself thinking that your lens is broken, it’s usually because this little switch got moved to MF by mistake, so always check there first before having a heart attack )
#4 Distance Scale
Again, you are probably aren’t going to use this too often, unless perhaps you are a landscape photographer.
You use it when you want to make use of hyperfocal focusing, which is mainly for times when you want to maximise depth of field in an image (i.e when you want everything from front to back in sharp focus) You set the distance using the scale, and then use Manual focus on your lens instead of Auto Focus.
For most people reading this blog (which is aimed at child and family photographers) you are truly never likely to use this. I can safely say I have NEVER used this - and never will!

#5 Maximum Aperture
This number is the maximum aperture of the lens.
For those of you who are new to photography, let me take a moment to quickly explain what aperture is.
Aperture is essentially a small opening in your lens that lets light into your camera’s sensor. The size of the opening is measured in F-stops - the smaller the opening, the larger the F-stop number. So, a small number like F2.8 is a large opening, and F16 is a small opening. (it seems like it should be the other way round I know!) Basically, the smaller the number, the larger the aperture.
This number of your lens is just telling you the widest the aperture of the lens can go.
So in the example above, the Maximum Aperture is F4.
In the example below (which shows another place on the lens you can often see this - on the front ring around the front of the lens) the maximum aperture is F1.4.
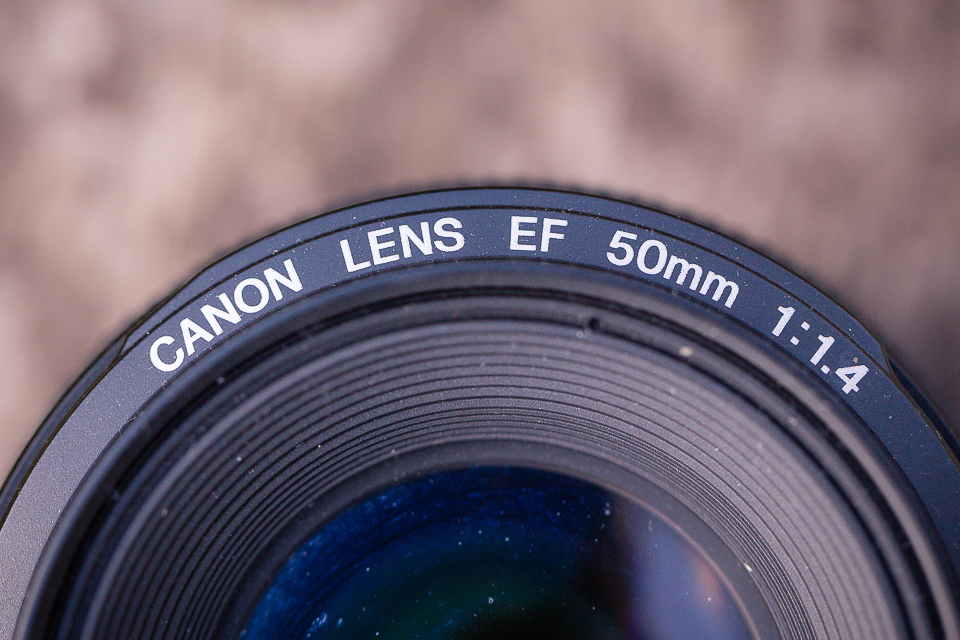
(oooohhh, I need to clean my lenses!)
If you have two numbers separated by a dash (for example F3.5 - F5.6), this means that the maximum aperture changes with the focal length of the zoom.
You can read more about Aperture here, and more about understanding the lens numbers here.
#6 Image Stabiliser
Some lenses have an additional feature called Image Stabilisation (IS).
It’s not always called Image Stabilisation just to help confuse you further, it can also be called Vibration Reduction (VR) Vibration Control (VC) among others, but they all do the same thing.
What this does is allow you to handhold lenses at lower than recommended shutter speeds, without introducing motion blur.
For example, a good rule of thumb for hand holding a lens is that you shouldn’t use a slower shutter speed than the focal length of your lens. So, for example, if you have a 85mm focal length lens, you would never try to take a photograph with a shutter speed of under 1/85. This is only to counteract YOUR movement with the lens, and to stop you getting motion blur (ie not tack sharp image) from it.
However, if you have Image Stabilisation, you can turn this on, and you should be able to handhold the lens with a lower number, lets say for example, 1/40, without getting motion blur.
One BIG point to note here is that IS only makes a difference to blur you would get from YOUR movement, not from your subjects. So, if you are photographing a moving subject, you are going to need a higher shutter speed than that anyway, so please do keep that in mind!
Only turn IS on when you are shooting a stationary object and you need to use a slower shutter speed than you can reasonably expect to hand hold, otherwise, keep it switched off as it does more harm than good if you have moving subjects.
#7 Zoom Ring
If you have a zoom lens, you will also have a zoom ring!
This just allows you to zoom in and out, and choose different focal lengths.
If you have a prime lens, you won’t have one of these, since they are a fixed focal length.
#8 - Focal Length Selected
As you zoom in and out, you will change the focal length of the lens.
So these numbers at the bottom of the lens is simply some of the focal lengths within your zoom (in this case 24mm, 35mm, 50mm and 70mm) and the little line at the bottom is just showing you which focal length you are currently at. In this case, the focal length of the zoom is currently at 24mm.
Again, if you have a prime lens, you won’t have this on your lens, as you only have the one focal length.
I’d also suggest you take a look at these other blog posts that go into even more detail on certain aspects of this, so you can get a more in depth look on anything that seemed too confusing.
Check these out:
Different Types of Camera Lenses (And When To Use Each One)
What do the numbers on your lens mean?
Zooms vs Primes - Which is Right For You?
As always, if you have a question, or just a comment you’d like to make, please leave it below - I always love to hear from you!
Before you go, make sure you sign up to become a Live Snap Love "Insider", and get access to our subscriber only Resource Library, where you can get your hands on loads of cheatsheets, checklists, ebooks and more!
If you enjoyed this post, please share! You can pin it, share it on Facebook or Twitter, or just let your friends know about the blog. Both they and I will thank you for it.